Summary
A language track is one of the rows that show up as tabs above the dubbr timeline (e.g. ENG, DEU, POL). Each track has its own transcript, subtitles, voiceovers, title, description, and visibility. This article shows how to add, delete, switch, and configure language tracks. Including the per-language STATE (Playable / Private / Hidden).
Where language tracks live
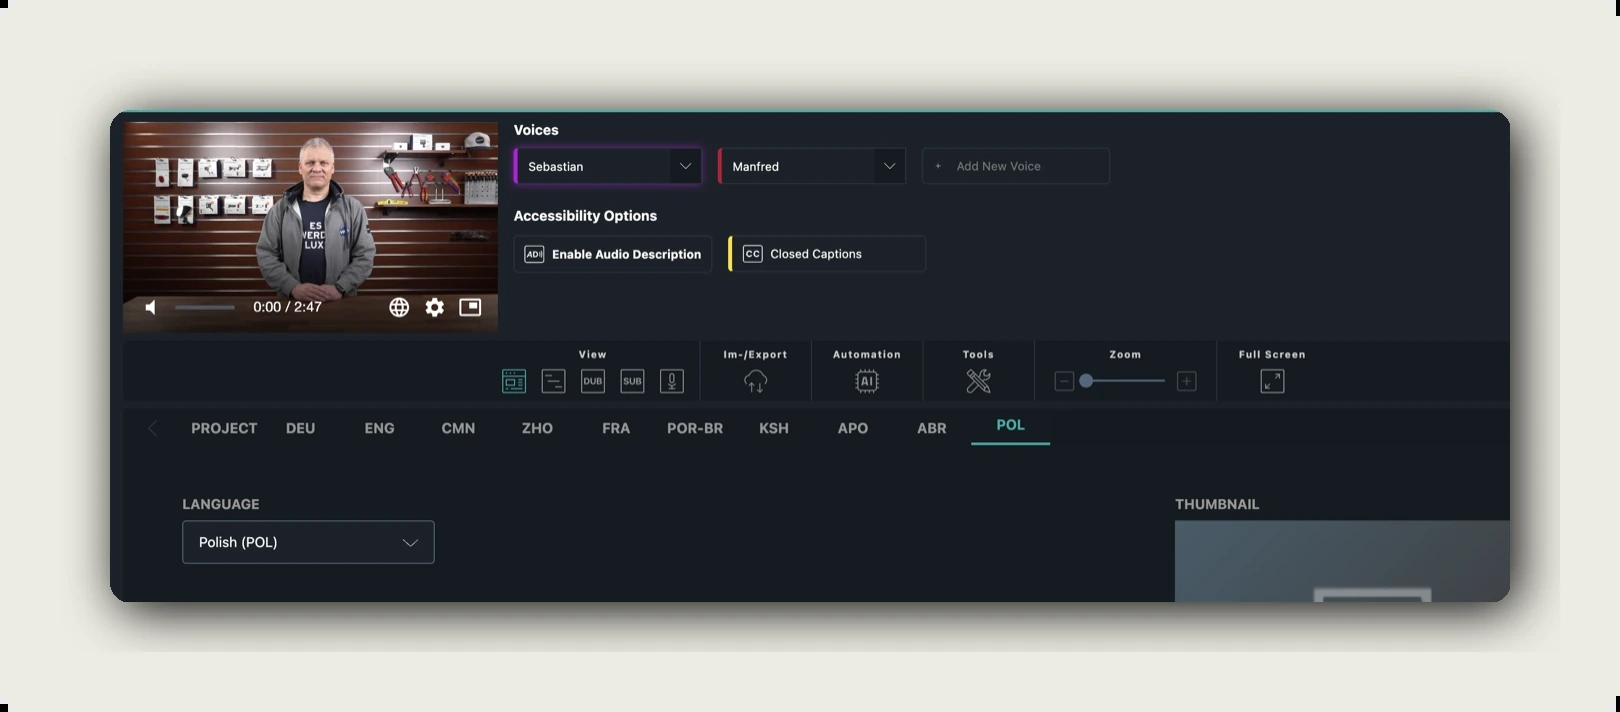
Open a video in the dubbr (View channel → EDIT). Above the timeline you see a scrollable Language Tabs bar: PROJECT · DEU · ENG · CMN · ZHO · FRA · …
- The PROJECT tab is the project overview. Status, tasks, per-language audit, project-level visibility, licences. It is not a language.
- Every other tab is a language track identified by its ISO 639-3 code. The active tab has a teal underline.
- Tabs scroll horizontally with the chevron arrows on either end when you have more languages than fit on screen.
Add a new language track
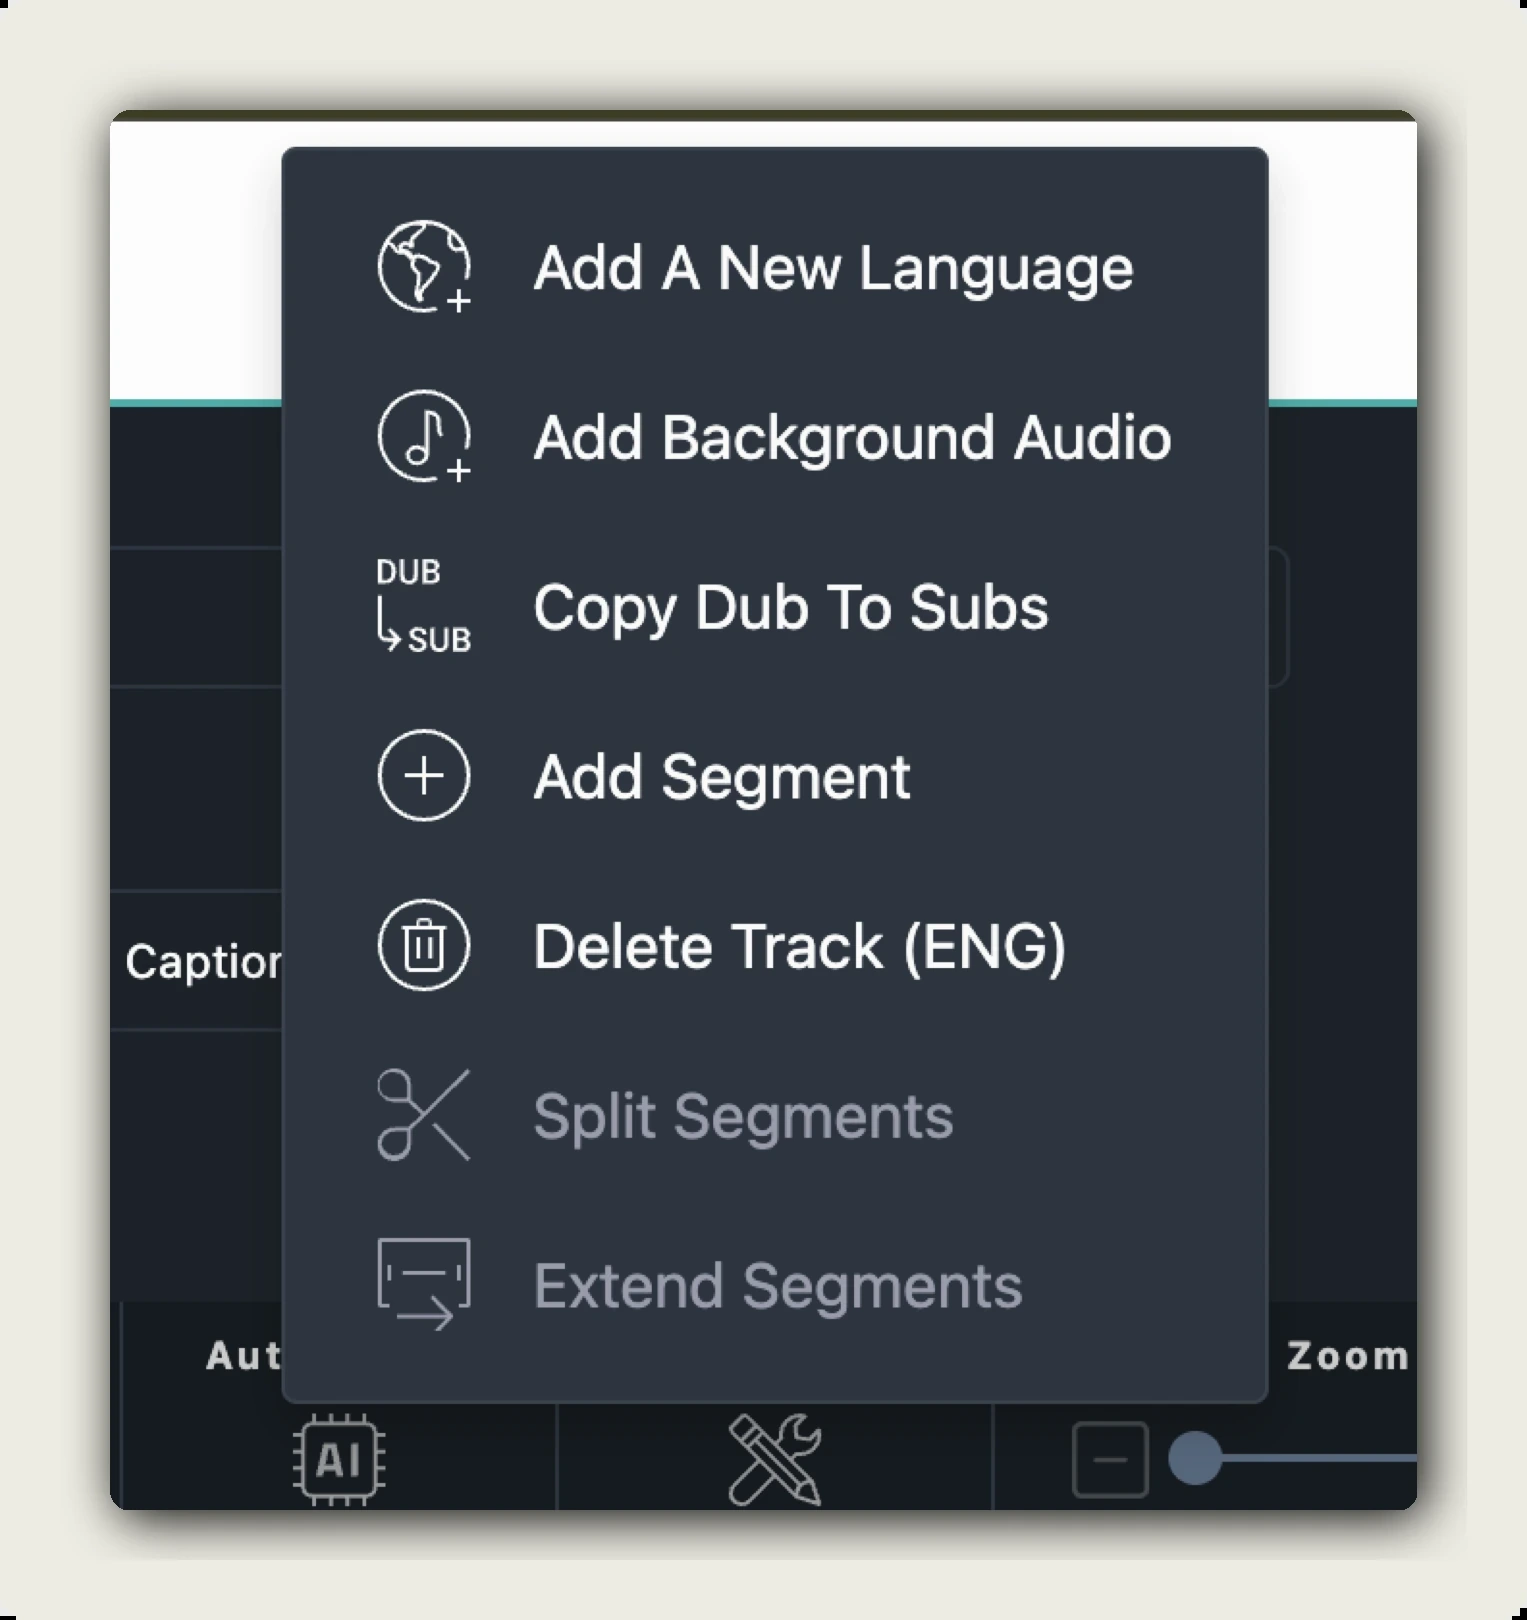
In the dubbr toolbar, click Tools → Add A New Language. The ADD A NEW LANGUAGE dialog opens.
Step 1. Pick the language
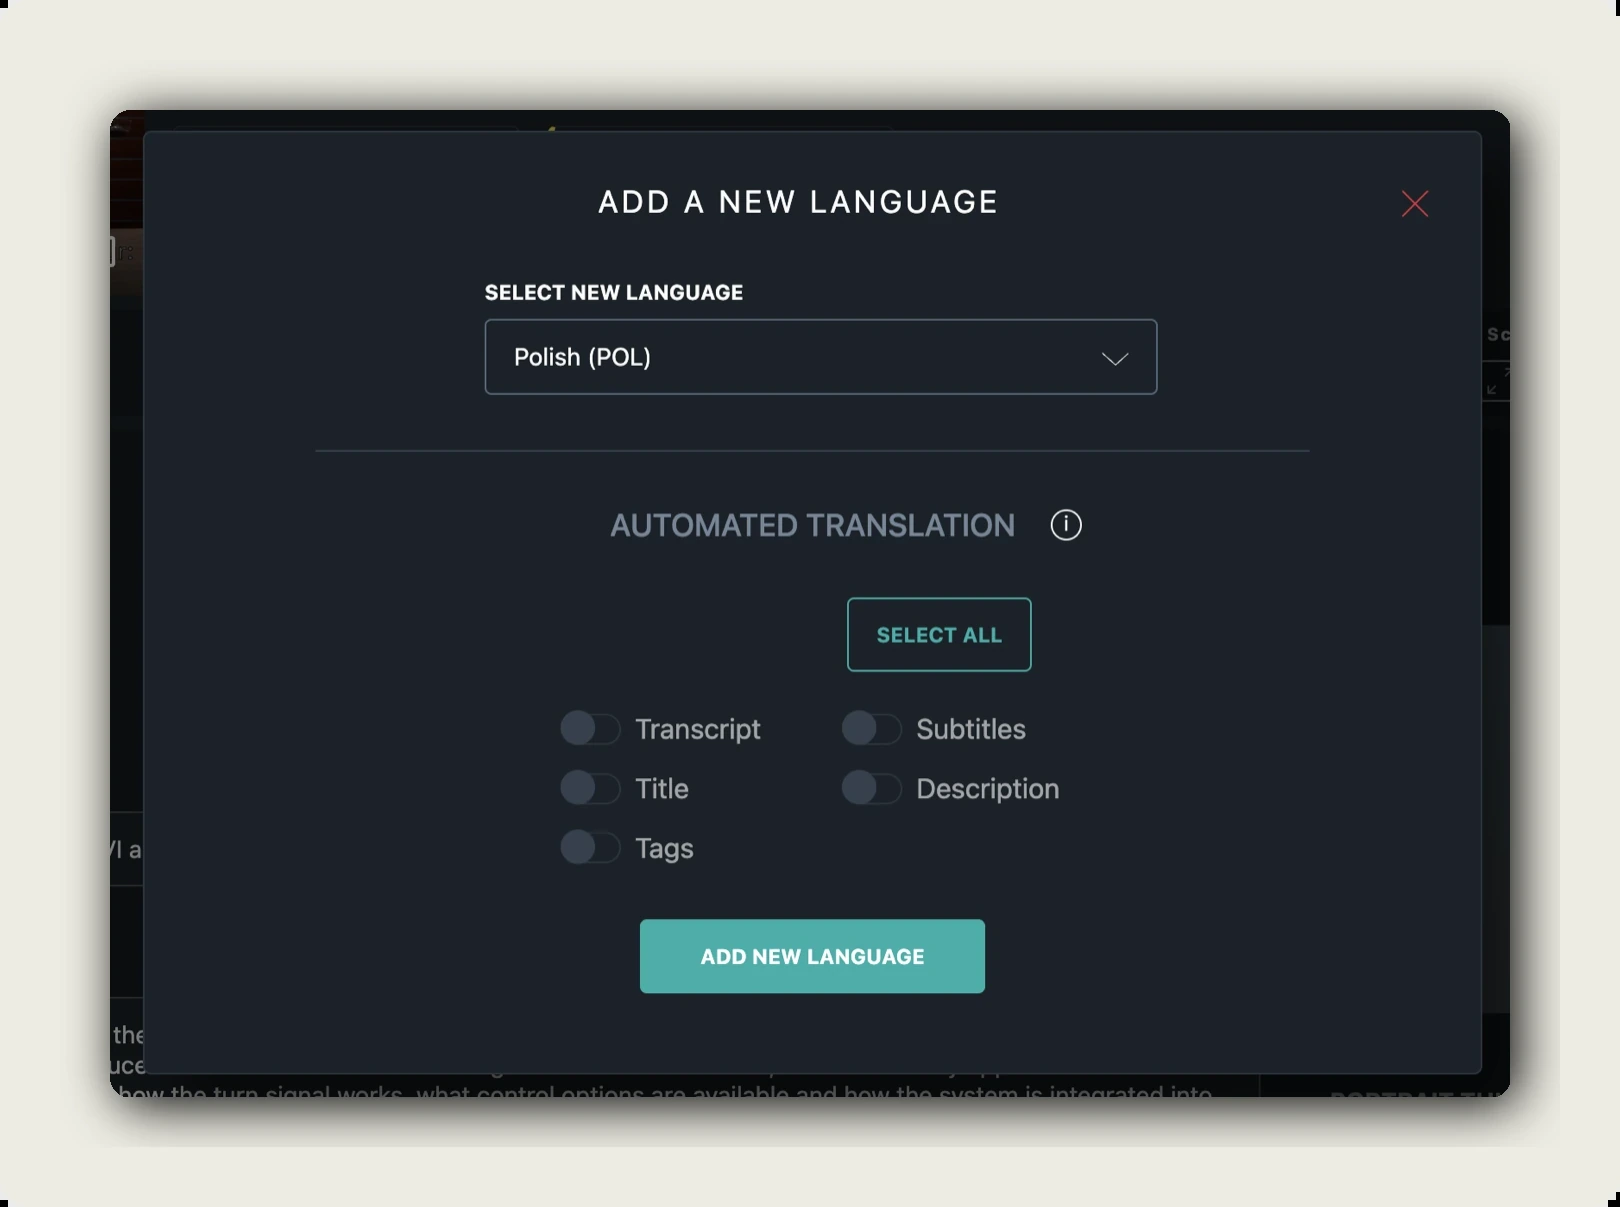
Under SELECT NEW LANGUAGE, type to filter or scroll through the list. alugha supports 200+ ISO languages, each shown with its 3-letter code (e.g. Polish (POL), Adi (ADI)).
Step 2. (Optional) Translate at the same time
Below the language picker sits the AUTOMATED TRANSLATION block. Toggle which fields to translate from an existing language onto the new one:
- Transcript, the full dub text (drives Text-To-Speech later).
- Subtitles, the on-screen subtitle segments.
- Title, the video title for the new language.
- Description, the video description.
- Tags, the keyword tags.
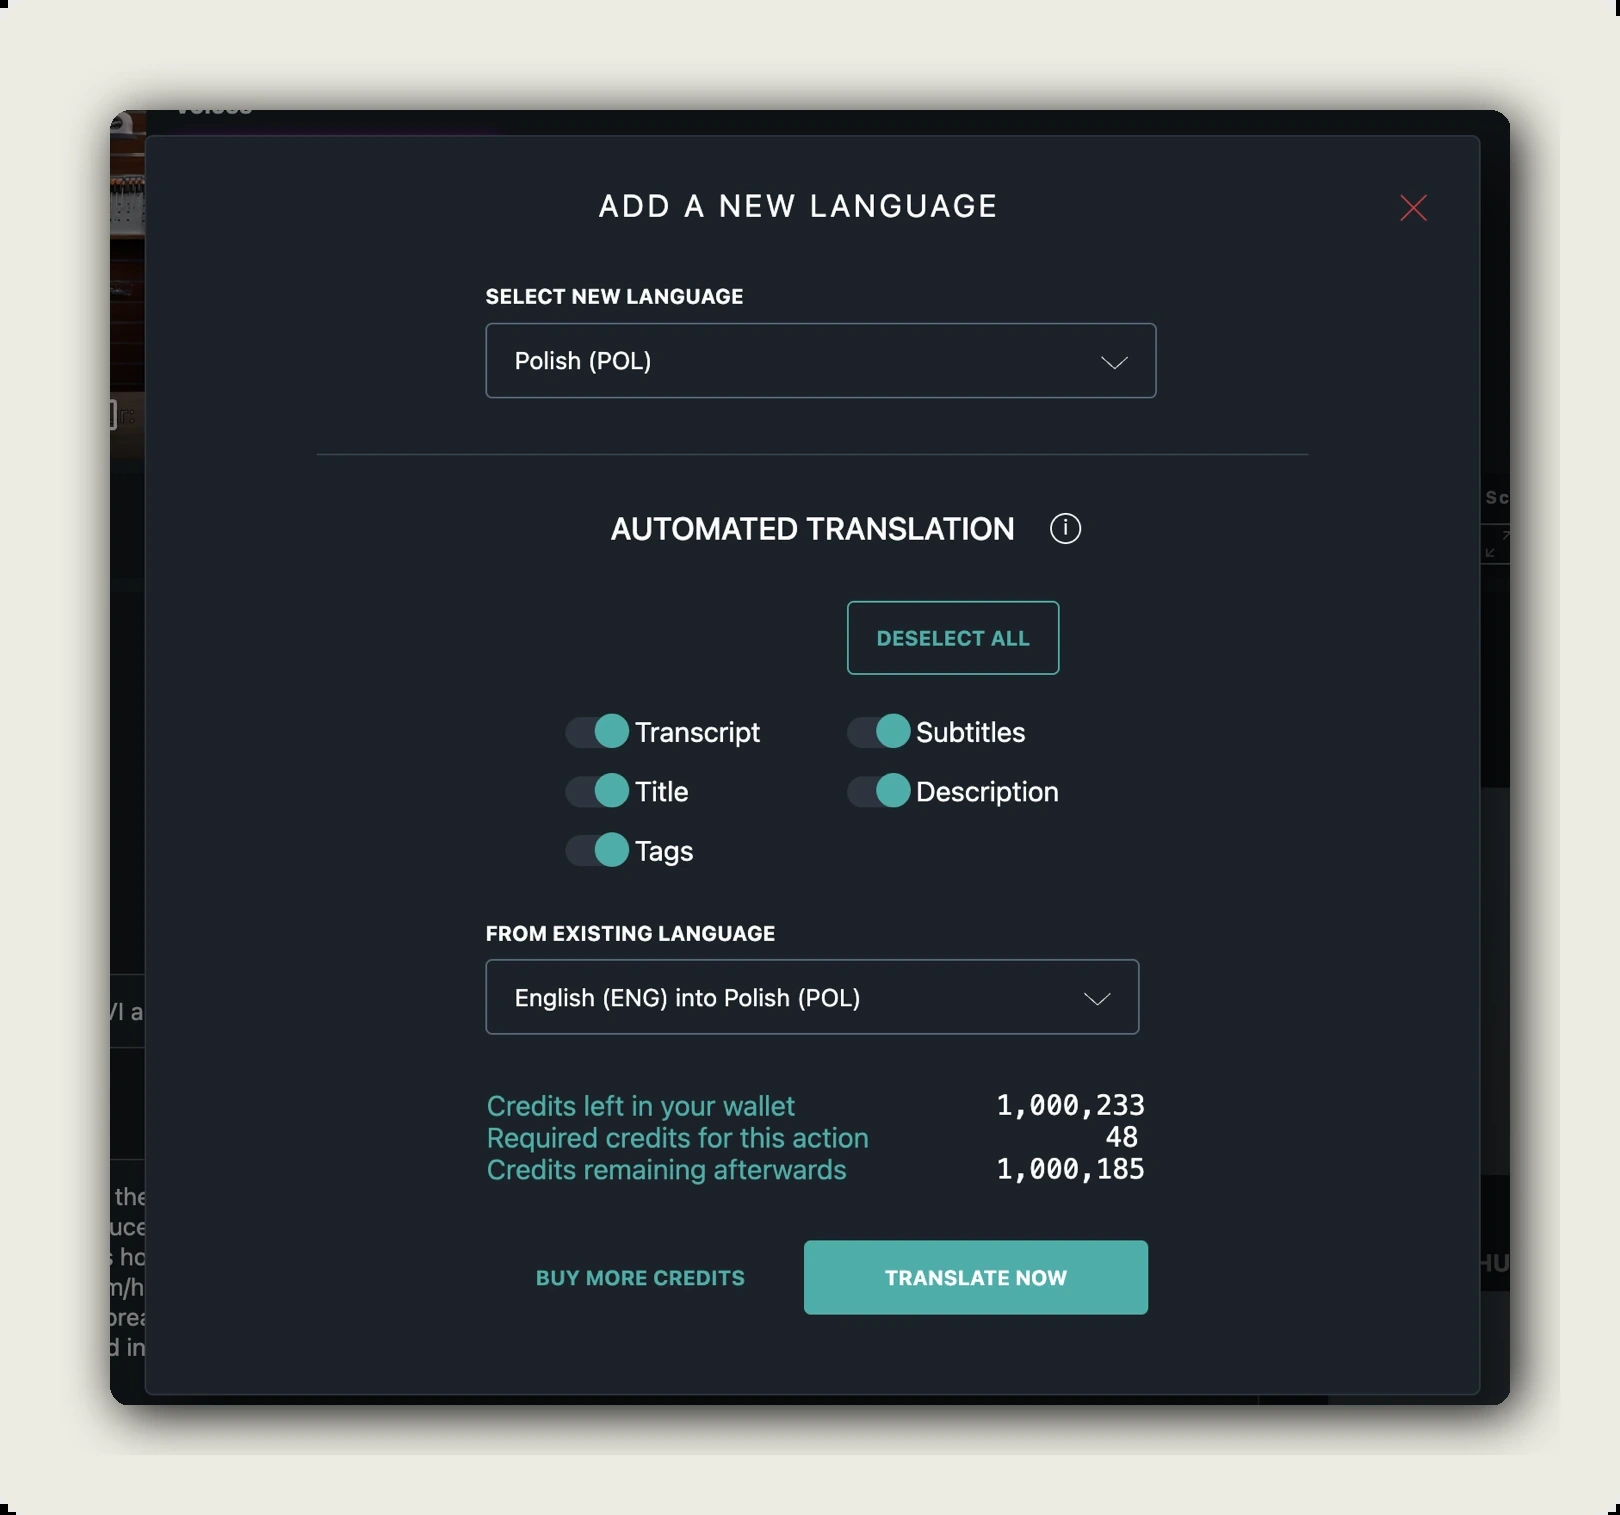
Use the SELECT ALL / DESELECT ALL button to toggle everything at once. After at least one toggle is on, a FROM EXISTING LANGUAGE dropdown appears (e.g. English (ENG) into Polish (POL)).
Step 3. Review credits
The dialog shows your three credit numbers: Credits left in your wallet, Required credits for this action, and Credits remaining afterwards. Translation cost depends on how many fields you toggled on and on the length of the source content (typically 30–50 credits for a short video with everything selected). A BUY MORE CREDITS link sits next to the action button if you’re short.
Step 4. Add the language
Click TRANSLATE NOW if you enabled at least one translation toggle, or ADD NEW LANGUAGE to add an empty track without translating. The new tab appears at the right end of the Language Tabs bar. If translation was requested, a job appears under Active jobs on the PROJECT tab; once complete, the yellow Reload now banner shows up at the top. Click it to load the translated content.
Switch between language tracks
Click any tab in the Language Tabs bar to switch to that language. The timeline, transcript, subtitles, voice assignments, and metadata fields all reflect the active language. Voices are project-wide and persist across tabs. You assign a voice to a speaker once.
Keyboard tip: hover the Language Tabs bar, then use the scroll wheel to scroll horizontally when you have many languages.
Delete a language track
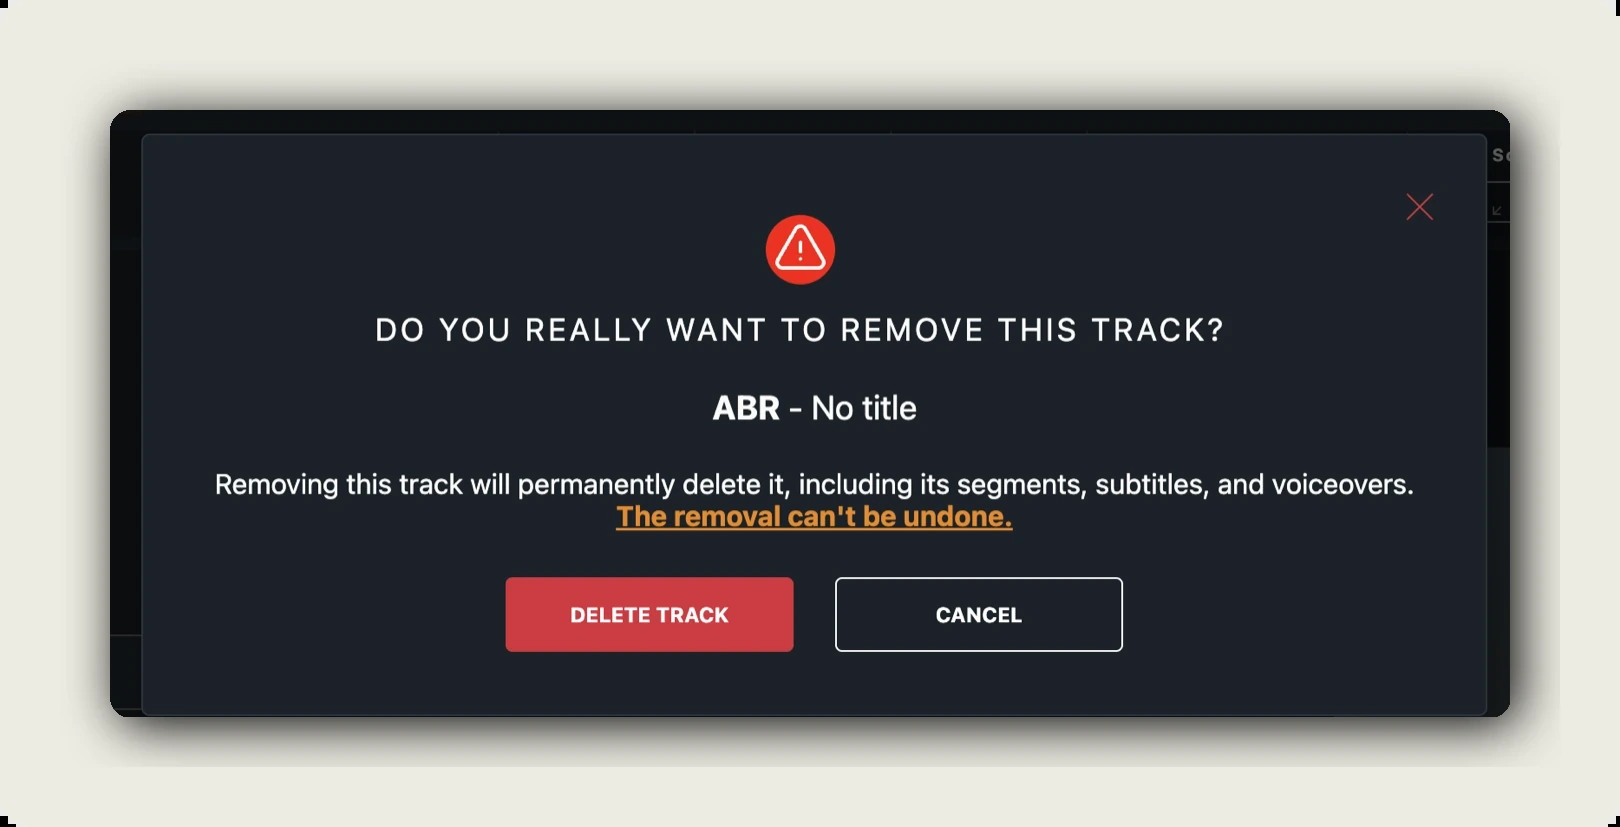
Switch to the language tab you want to remove. In the toolbar, click Tools → Delete Track (XXX), the label always shows the active language’s 3-letter code (e.g. Delete Track (ABR)).
A red-warning confirmation appears: DO YOU REALLY WANT TO REMOVE THIS TRACK? showing the language code and the track’s title (or No title if blank). The warning reads:
Removing this track will permanently delete it, including its segments, subtitles, and voiceovers. The removal can’t be undone.
Click DELETE TRACK (red) to confirm or CANCEL to back out. Once gone, the only way to get the track back is to re-add the language, with empty content.
Per-language STATE: Playable, Private, Hidden
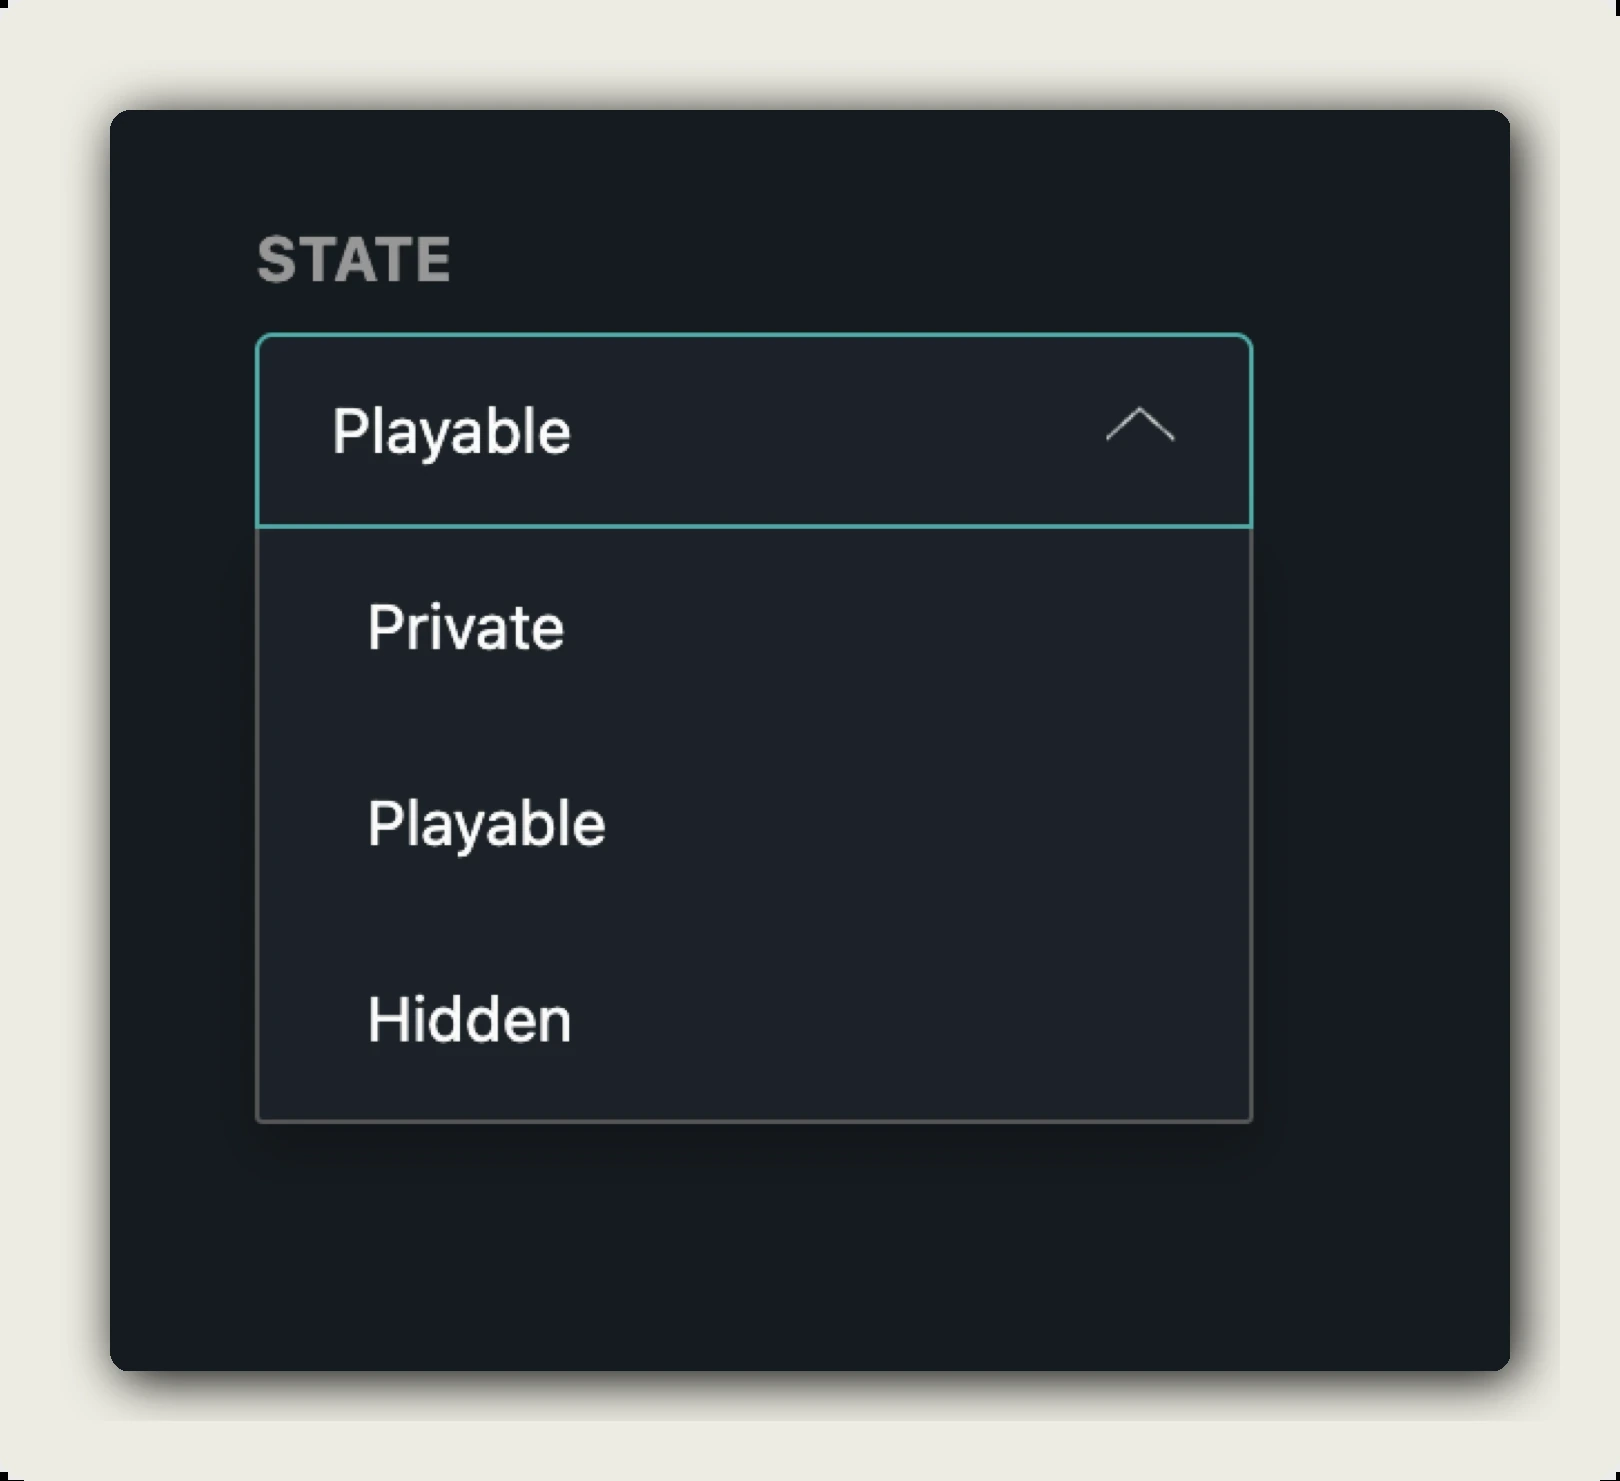
Each language track has its own visibility setting. Independent of every other language and independent of the project-level visibility on the PROJECT tab. Switch to the language tab, look at the right sidebar, find STATE:
- Playable. Available in the player’s language picker. Viewers can pick this language.
- Private. Not exposed to viewers. Use while you’re still translating or re-recording.
- Hidden. Published but excluded from the language picker. Useful for a language you want addressable by direct link but don’t want listed as a public option.
Save with Save changes at the bottom of the metadata column.
Project-level visibility on the PROJECT tab (Public / Private / Not listed) sits on top of language-level STATE: if the project is Private, no language is playable for outsiders regardless of its STATE.
Other Tools-menu items that touch language tracks
The Tools menu groups everything that mutates the active language’s structure:
- Add A New Language. Covered above.
- Add Background Audio. Upload a music bed or ambient track that plays under the dub for the current language.
- Copy Dub To Subs. Copy the dub text into the Subs track so you have dedicated subtitle segments to edit. See How to manage subtitles.
- Add Segment. Insert a manual segment at the playhead position.
- Delete Track (XXX). Covered above.
- Split Segments. Split the selected segment at the playhead.
- Extend Segments. Stretch the selected segment’s end timecode.
Recording Settings is not in this menu. It lives in the Recording Panel at the top-right of the dubbr. See How to manage recording.
Per-language metadata fields
When a language tab is active you see the language’s metadata in the main column:
- LANGUAGE, the language itself (read-only; set when you added the track).
- TITLE, the per-language title.
- DESCRIPTION, the per-language description.
- TAGS. Per-language keyword tags. The GENERATE METADATA (AI) button next to the tags field can fill title, description, and tags from the transcript in one click.
- THUMBNAIL and BACKGROUND. Per-language images (e.g. localized title cards).
- AUDIO TRACK. Upload a finished audio file directly for this language (alternative to dubbr recording or TTS). You can also paste a Vimeo URL.
Click Save changes at the bottom of the column to commit. The PROJECT tab’s per-language audit picks up the new values immediately.
Tips
- Translate from the cleanest source. The FROM EXISTING LANGUAGE dropdown lets you pick any track. Translate from the language with the cleanest transcript. Usually the original.
- Add languages incrementally. Adding eight languages at once with full translation can spike credit usage. Add two or three, verify the output, then add the rest.
- Stage with Private. Set the new language’s STATE to Private while you fix translation issues, flip to Playable when ready.
- Generate metadata after translation. Click GENERATE METADATA (AI) on the new language tab to auto-fill localized title, description, and tags from the translated transcript.
- Delete carefully. Delete Track is irreversible. If you might want the language back, set STATE to Private instead.
Troubleshooting
The language I want isn’t in the picker:
- The list covers 200+ ISO 639-3 languages. Try filtering by the language’s native name in English (e.g. Polish, not Polski).
- Some rare languages may not be supported by the AUTOMATED TRANSLATION engine; you can still add the track empty and fill it manually.
TRANSLATE NOW is greyed out:
- You need at least one toggle (Transcript / Subtitles / Title / Description / Tags) enabled.
- Confirm you have enough credits, the Credits remaining afterwards number cannot be negative.
I added a language but the tab is empty:
- If you used ADD NEW LANGUAGE (not TRANSLATE NOW), the tab starts empty by design.
- If you used TRANSLATE NOW, the translation job may still be processing. Check Active jobs on the PROJECT tab and click Reload now when it completes.
Viewers can’t pick the new language in the player:
- STATE must be Playable (not Private or Hidden).
- Project-level visibility on the PROJECT tab must be Public or Not listed, if Private, no language is playable for outsiders.
- The track must be published. Use Publish Project (Im-/Export menu) if you haven’t published yet.
Where to go next
- Translate your video with Add A New Language, the deep dive on the translation step.
- Transcribe with Speech-To-Text, before translation, get a clean transcript on the source language.
- Generate AI voiceover with TTS, after translation, generate the dub.
- How to manage audio
- How to manage subtitles
- How to manage recording
Was this article helpful?