Summary
Turn your dubbing transcript into editable subtitles with one click. Copy Dub To Subs reuses the text from your dub track and creates dedicated subtitle segments on the same language — so you can ship accessible videos without typing subtitles from scratch.
Dub vs. Subs: why this matters
alugha projects have two parallel tracks per language:
- Dub — the spoken text (transcript and translation) that Speech-To-Text and Automated Translation produce. It drives the AI voiceover.
- Subs — the subtitle segments that appear on screen in the player.
After running Speech-To-Text and Automated Translation you have a dub on every language — but the subtitle track is still empty. The alugha player will fall back to the transcript, but dedicated subtitles are shorter, better-timed, and independently editable — which is what viewers actually want.
Copy Dub To Subs copies the dub text into the subtitle track for the current language, giving you a starting point you can trim and polish.
Prerequisites
Before you begin:
- A dub on the target-language track — typically from Speech-To-Text (source) or Automated Translation (targets).
- No credits required — Copy Dub To Subs is a local text copy, not an AI action.
- Run Copy Dub To Subs per language — it only affects the currently selected language tab.
Step-by-Step Instructions
1. Switch to the language tab you want to subtitle
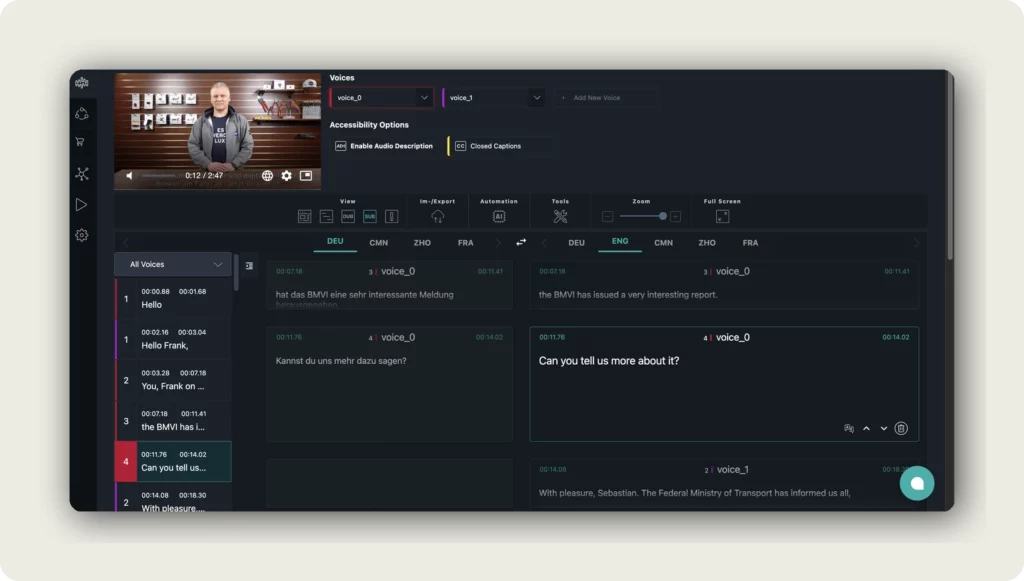
Open the video in the dubbr (My archive → EDIT) and click the language tab for the language you want subtitles in (for example ENG). Copy Dub To Subs always runs on the currently selected track — not on the PROJECT tab and not on all languages at once.
Confirm that the track has a dub (transcript or translated transcript) — the subtitle track will be populated from whatever is in the dub.
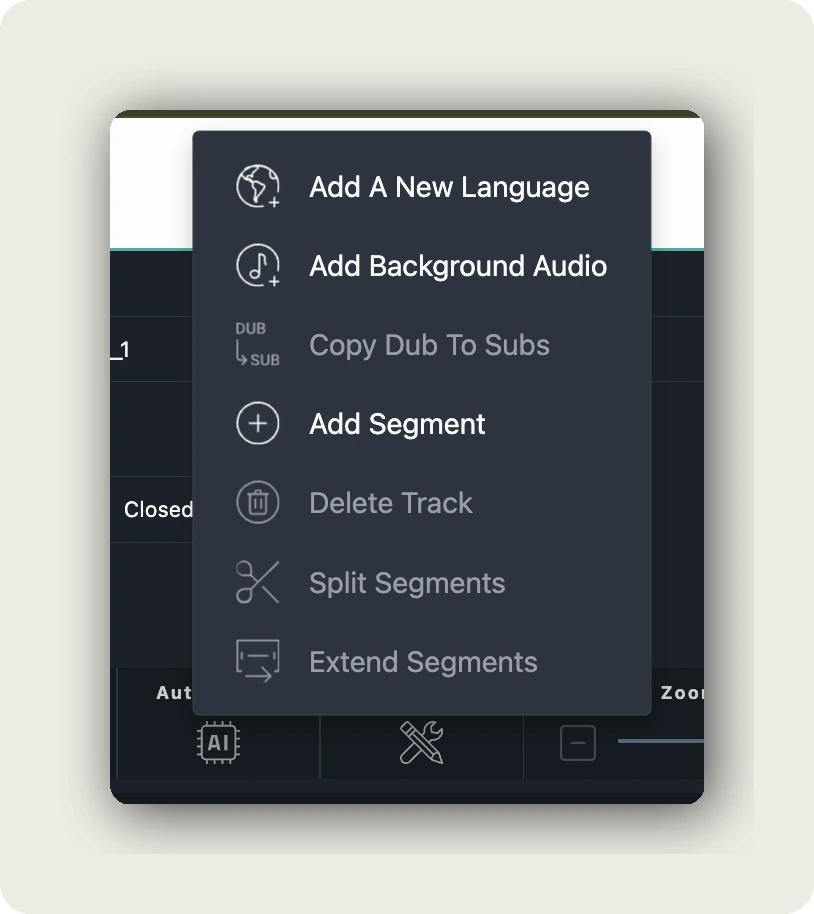
2. Open Tools → Copy Dub To Subs
In the dubbr toolbar click Tools (the wrench icon). The dropdown shows the full set of track-management actions:
- Add A New Language — add another language track
- Add Background Audio — add music or ambient sound
- Copy Dub To Subs — this action
- Add Segment — create a new empty segment
- Delete Track — remove the entire current language
- Split Segments / Extend Segments — timing-level edits
Click Copy Dub To Subs to open the confirmation dialog.
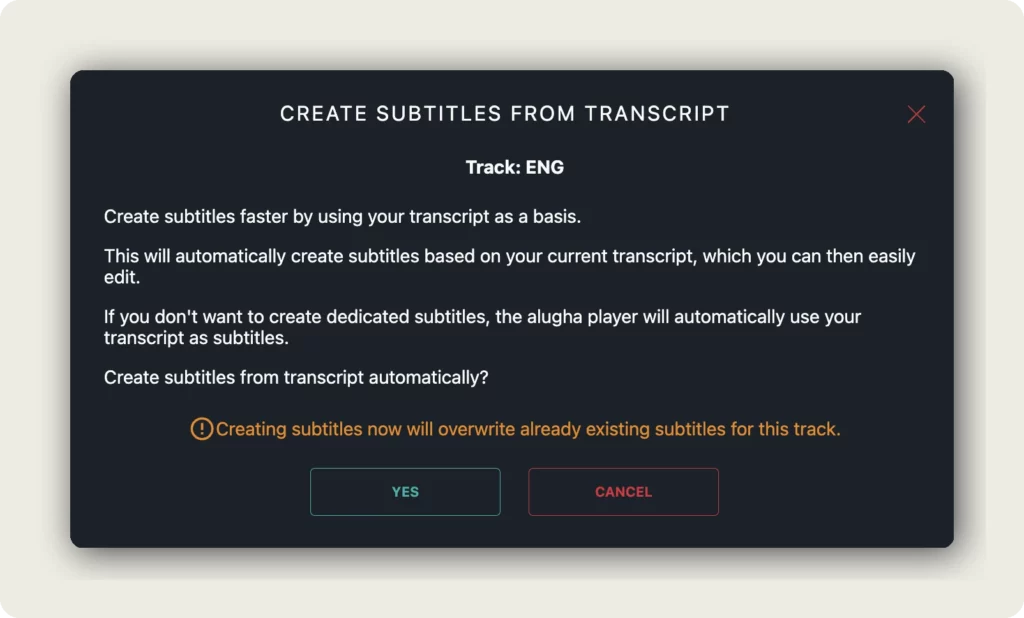
3. Review the CREATE SUBTITLES FROM TRANSCRIPT dialog
The dialog shows the current track (for example Track: ENG) and three short explanations:
- Create subtitles faster by using your transcript as a basis.
- This will automatically create subtitles based on your current transcript, which you can then easily edit.
- If you don’t want to create dedicated subtitles, the alugha player will automatically use your transcript as subtitles.
If the track already has subtitles, you will see a yellow warning: “Creating subtitles now will overwrite already existing subtitles for this track.” Proceed only if you are fine replacing them.
4. Click YES to create the subtitles
Click YES to run the copy. The dialog closes and a green Subtitle segments have been created banner appears at the top of the editor. The view automatically switches to SUB so you can see the new subtitle segments immediately.
Click CANCEL to close the dialog without creating or overwriting subtitles.
What happens next
Your language now has dedicated subtitle segments that mirror the dub text but can be edited independently. In the DUB view you still see the original spoken/translated text, in the SUB view you see the subtitle version — and the two can diverge as you edit.
Repeat Copy Dub To Subs on every language you want subtitles for — the action runs per-track. After you are happy with the subtitles, export them in WebVTT, SRT, or Text, or publish the language so viewers see the subtitles in the player.
Good to know
- No credits — Copy Dub To Subs is a local text copy, not an AI action.
- Runs per language. If you want subtitles on DEU, ENG, and FRA, run it three times (once on each tab).
- Good subtitle practice is shorter than the transcript. After Copy Dub To Subs, trim or split long segments so they read at subtitle pace.
- The alugha player falls back to the transcript if a language has no dedicated subtitles — but dedicated subtitles are always better for viewers.
- Re-running Copy Dub To Subs overwrites the existing subtitle track for the current language. Edits you made to the subtitles are lost.
Troubleshooting
Copy Dub To Subs is greyed out or does nothing:
- Make sure a language tab is selected — the action needs a current track.
- Confirm the track has a dub (transcript or translated transcript). A completely empty track has nothing to copy.
The subtitles look exactly like the dub (too long):
- That is expected right after Copy Dub To Subs. Subtitles should be shorter than spoken text. Edit individual segments in the SUB view to shorten them.
- Use Tools → Split Segments on long subtitle segments to break them into readable chunks.
I ran Copy Dub To Subs and lost my edits:
- Copy Dub To Subs overwrites the subtitle track for the current language. Always confirm the warning banner before clicking YES.
- If you need to undo, restore an earlier version of the project — otherwise, re-edit the segments.
The player still shows no subtitles:
- Confirm the language is published or available — private languages do not show in the player.
- In the player, open the subtitles menu and select the language manually to verify it is available.
Related Articles
- Transcribe your video with Speech-To-Text
- Translate your video with Add A New Language
- Import subtitles into your project
- Export subtitles in WebVTT, SRT, or Text format
Was this article helpful?