Summary
Use the dubbr’s AI pipeline to transcribe, translate, and generate voiceover for your video — turning it into a fully multilingual project with just a few clicks.
Prerequisites
Before you begin:
- A verified alugha account (see Create and verify your alugha account)
- An uploaded video with a completed dubbr project (see Upload a video to alugha)
- Enough credits for transcription, translation, and voiceover (credit costs are shown before each step)
How the AI pipeline works
The dubbr uses an AI pipeline with 4 steps. Each step must be completed before the next one can run:
| Step | Feature | What it does |
|---|---|---|
| 1 | Speech-To-Text | Transcribes the spoken audio into text segments |
| 2 | Add A New Language | Adds a language track and translates the transcript via Automated Translation |
| 3 | Copy Dub To Subs | Creates subtitles from the translated dub so viewers see them in the player |
| 4 | Text-To-Speech | Generates AI voiceover from the translated text (optional) |
Step-by-Step Instructions
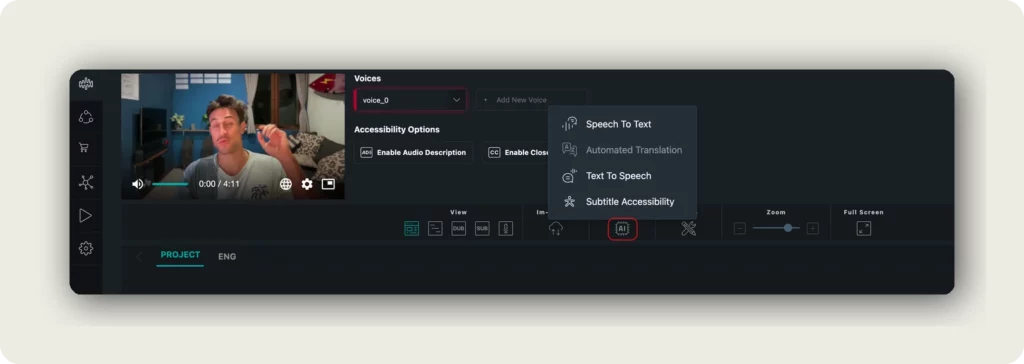
1. Open the Automation menu
Open your project in the dubbr. In the toolbar at the bottom, click Automation (the AI chip icon). This menu contains all AI-powered features: Speech To Text, Automated Translation, Text To Speech, and Subtitle Accessibility.
2. Transcribe your video (Speech-To-Text)
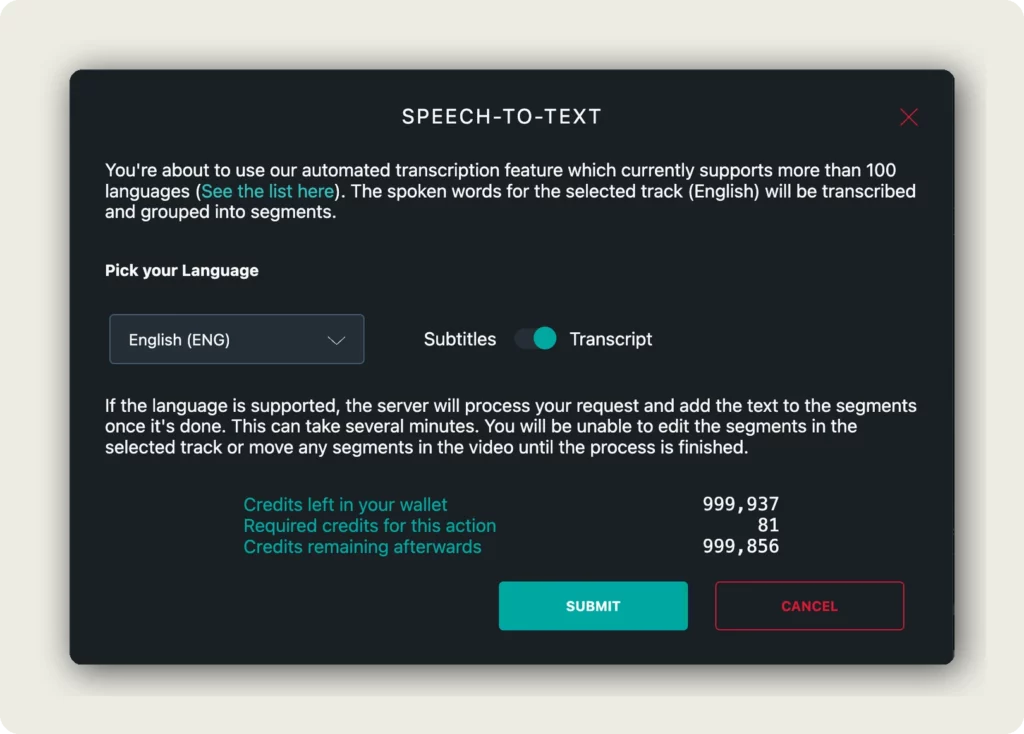
Click Speech To Text from the Automation menu. The Speech-To-Text dialog opens.
If you already enabled Generate Transcript (STT) during upload, this step is complete and you can skip ahead to step 3.
Configure the following:
- Pick your Language — Select the language spoken in your video (e.g., “English (ENG)”). This must match the actual spoken language for accurate results.
- Subtitles / Transcript toggle — Choose whether the output is saved as subtitles or as a transcript.
The credit cost for transcription is displayed at the bottom (e.g., 81 credits). Click SUBMIT to start. The transcription supports over 100 languages and runs in the background.
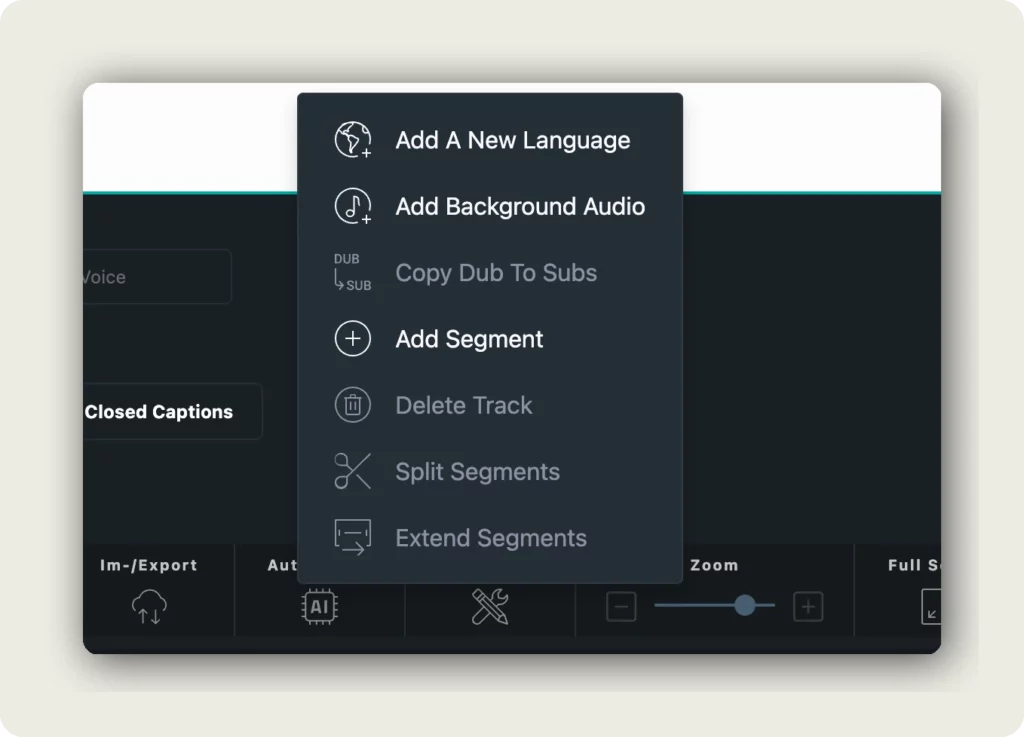
3. Add a new language and translate
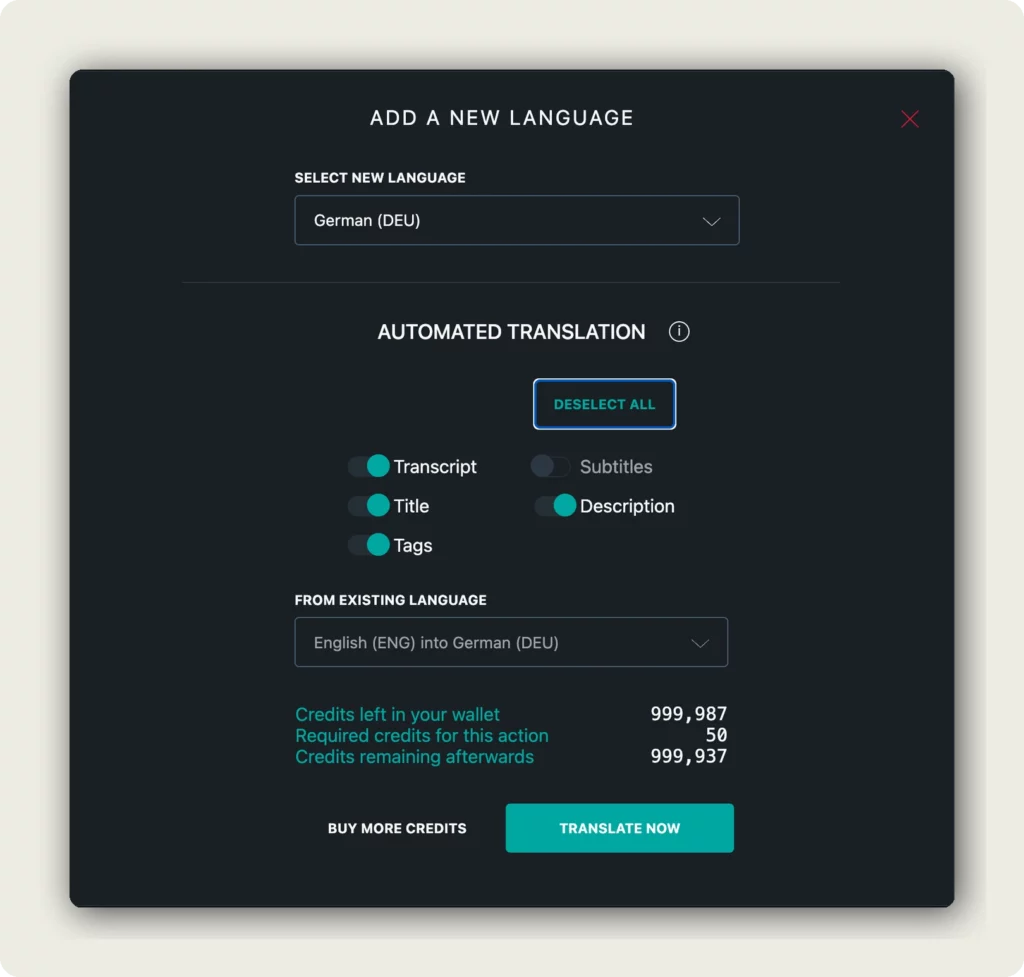
Once the transcription is complete, click Tools in the toolbar and select Add A New Language. This opens a dialog that combines adding a language with the automated translation in one step.
Configure the following:
- Select new language — Choose the language you want to translate into (e.g., “German (DEU)”). alugha supports over 200 languages.
Below the language selection, the Automated Translation section lets you toggle which content to translate:
- Transcript — The spoken text segments
- Subtitles — Subtitle text
- Title — The video title for this language
- Description — The video description for this language
- Tags — The video tags
Use Deselect All to turn off all toggles and select only what you need. Under From existing language, confirm the translation direction (e.g., “English (ENG) into German (DEU)”). The credit cost updates based on your selection. Click TRANSLATE NOW to start.
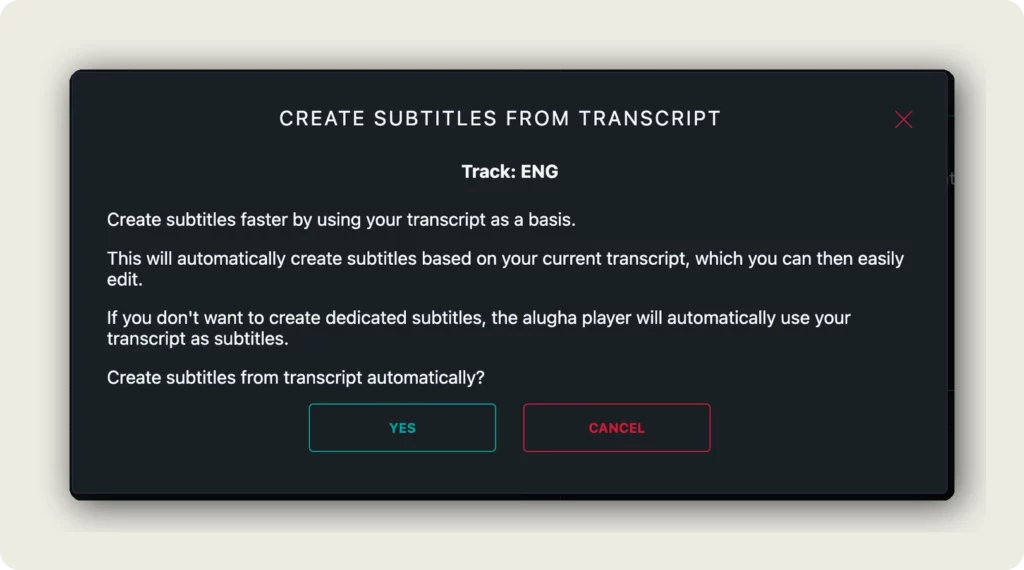
4. Copy dub to subtitles
The translation in the previous step creates the dub — the translated transcript used for voiceover. The alugha player can use the transcript as subtitles automatically, but for best results you should create dedicated subtitles that you can edit independently.
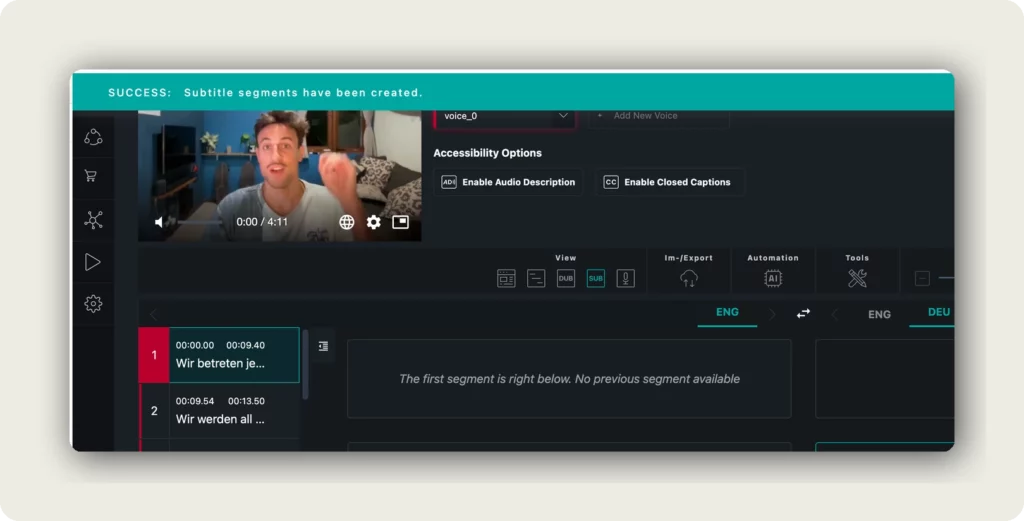
Click Tools in the toolbar and select Copy Dub To Subs. A confirmation dialog asks: “Create subtitles from transcript automatically?” — click YES. A green success banner confirms: “Subtitle segments have been created.”
5. Generate AI voiceover (Text-To-Speech)
This step is optional. If you only need translated subtitles, you can skip it.
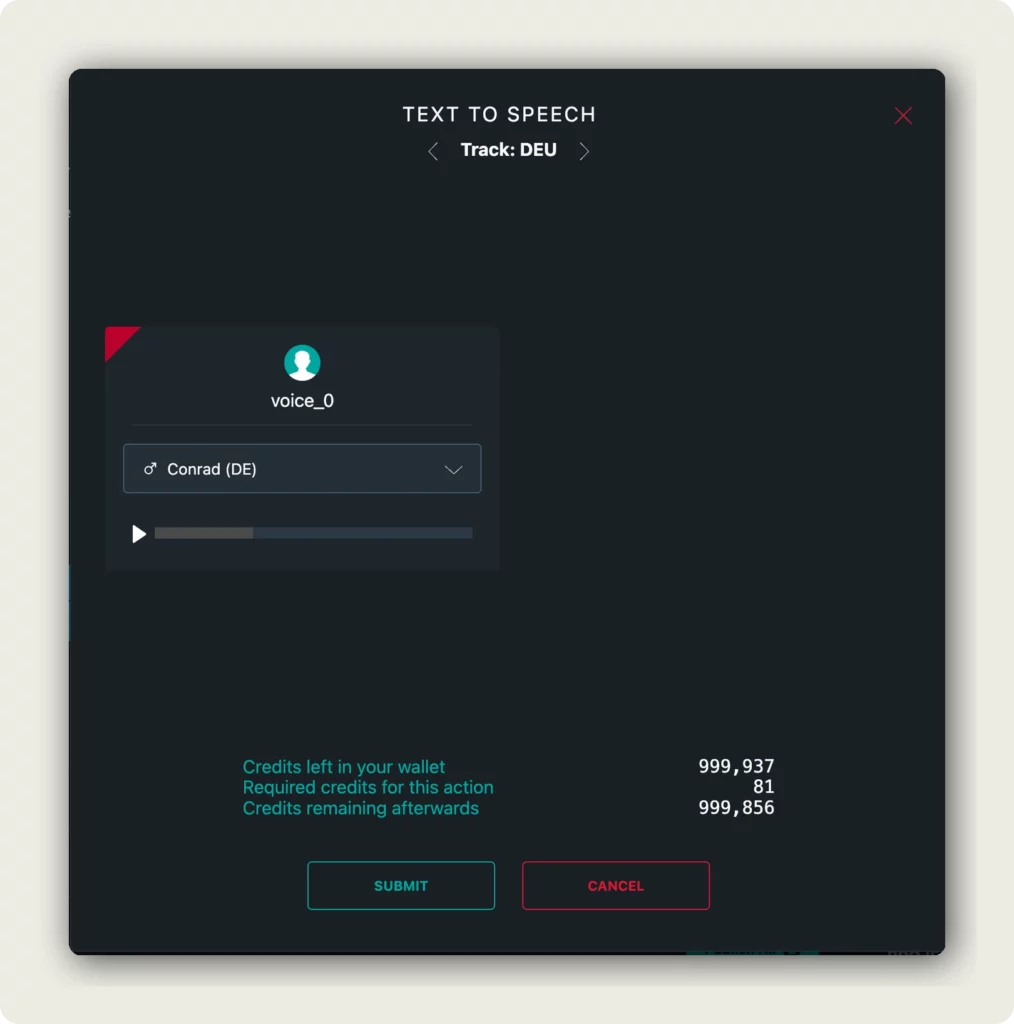
Once the translation is complete, click Automation → Text To Speech. The TTS dialog opens with a track navigator at the top (< Track: DEU >) — use the arrows to switch to your translated track.
Important: Text-To-Speech can only be applied to translation tracks, not to the default (original) track. If you see the warning “TTS cannot be applied to the default track,” switch to a translation track using the arrows.
For each voice in your video, select an AI voice:
- Each voice slot (voice_0, voice_1, etc.) gets its own AI voice
- Click the voice dropdown to browse available voices (e.g., “Conrad (DE)”, “Christoph (DE)”)
- Use the play button to preview a voice before selecting it
The credit cost is shown at the bottom (e.g., 81 credits). Click SUBMIT to generate the voiceover.
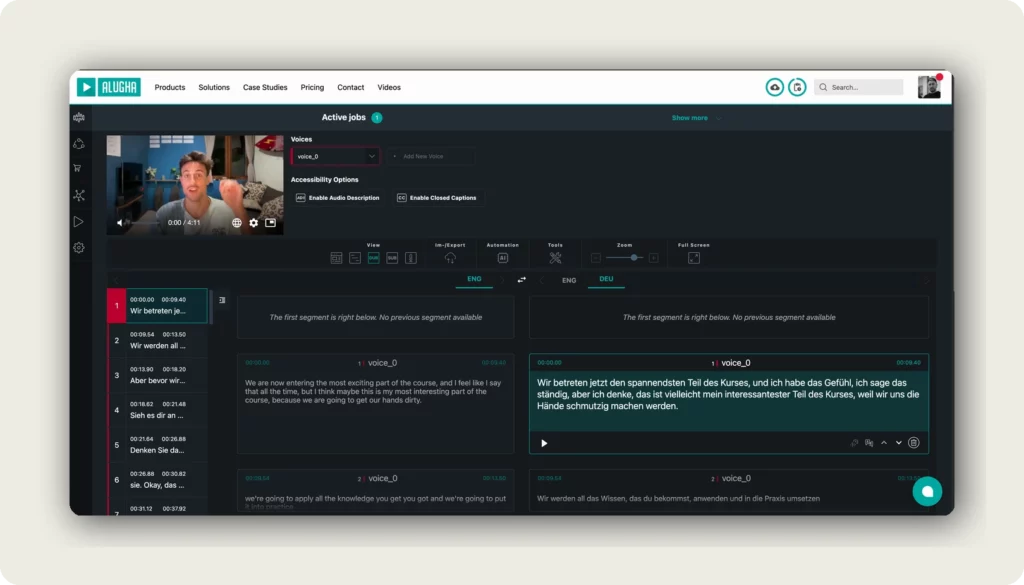
6. Review your translated track
After all jobs complete, click the language tab for your translated track (e.g., DEU) in the dubbr timeline. You can now review and edit the translated text segments, play back the AI voiceover, and make adjustments before publishing.
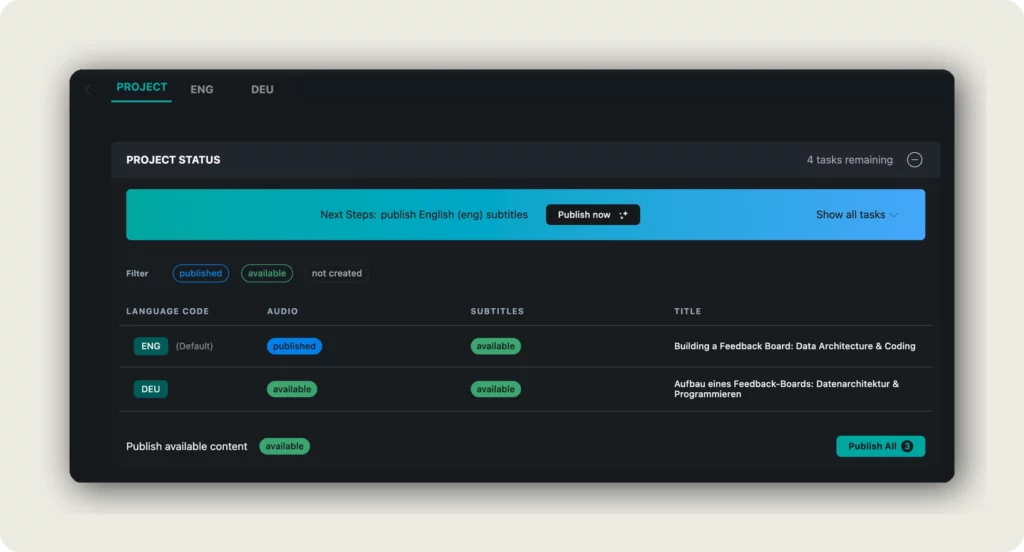
7. Publish your multilingual video
Click the PROJECT tab in the dubbr. The Project Status section shows you what is ready. You will see a Next Steps banner (e.g., “publish English (eng) subtitles”) and a language overview table with status badges: published, available, or not created.
Important: Only published subtitles and voices are available and selectable in the player. Content with the status “available” is ready but not yet visible to viewers — you must publish it first.
You have two ways to publish:
- From the Project Status: Click Publish now in the Next Steps banner, or click Publish All at the bottom to publish all available content at once.
- From the toolbar: Click Im-/Export and select Publish Project.
Your video is now available in multiple languages. See Embed your multilingual video to add it to your website.
Good to know
- Each step in the AI pipeline runs independently — you confirm the credit cost before each action.
- You can add multiple languages by repeating steps 3–4 for each target language.
- Text-To-Speech is optional. If you only need subtitles, you can skip step 5.
- Dub vs. Subtitles: The dub is the translated transcript (used for voiceover). Subtitles are what viewers see in the player. Always run Copy Dub To Subs (step 4) to make subtitles available.
- Translation supports over 200 languages, while transcription supports over 100 languages.
- Translating the title, description, and tags gives each language track its own SEO-optimized metadata.
- All AI processing runs in the background — you can leave the page and return later.
Troubleshooting
If “Automated Translation” is not available:
- Make sure Speech-To-Text has completed first — the transcript must exist before you can translate.
- Check the Active jobs bar at the top. If transcription is still running, wait for it to finish.
If Text-To-Speech shows “cannot be applied to the default track”:
- Use the track navigator arrows (< Track >) at the top of the TTS dialog to switch to a translation track.
- TTS only works on translated tracks, not on the original language track.
If you don’t have enough credits:
- Disable optional translation toggles (Tags, Description) to reduce the cost.
- Skip Text-To-Speech if you only need translated subtitles.
- Click Buy more credits in the translation dialog or purchase credits from your account settings.
Related Articles
Was this article helpful?